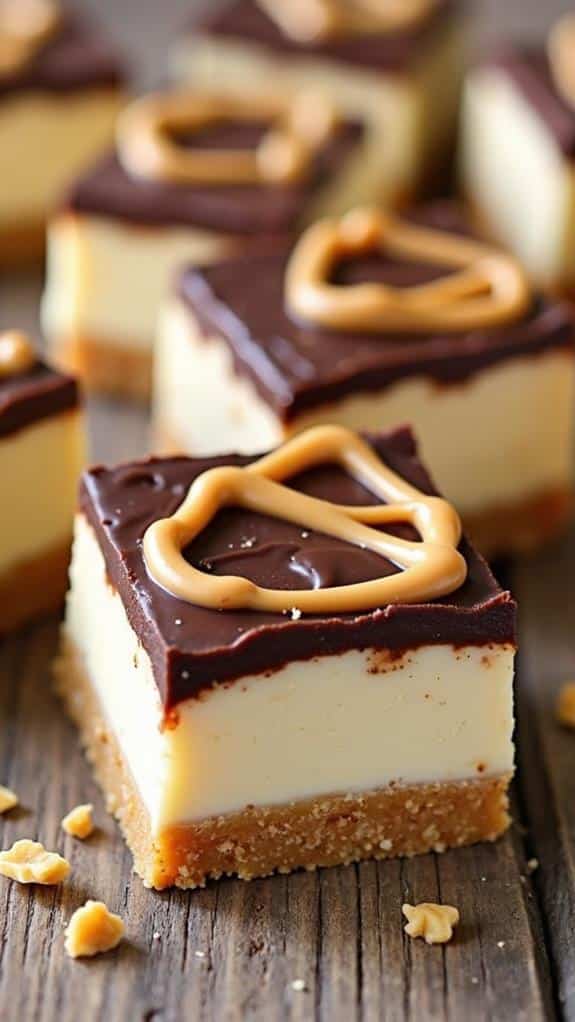
No-Bake Buckeye Cheesecake Bars

Perfectly creamy and indulgent, these No-Bake Buckeye Cheesecake Bars combine peanut butter and chocolate—discover how to make this irresistible treat!

No-bake Buckeye cheesecake bars are a total treat! I love how they mix creamy peanut butter and rich chocolate, all without turning on the oven. First, you crush graham crackers for the base, then whip up a smooth filling with peanut butter, cream cheese, and whipped topping. After spreading it on the crust, I melt chocolate chips to drizzle on top—it's so easy! You'll want to chill them for a few hours so the flavors meld perfectly. Trust me, these bars will impress your friends at any gathering. Stick around, and I'll share some fun variations and serving ideas!

What You'll Love About This Recipe

When you take that first bite of these No-Bake Buckeye Cheesecake Bars, you'll understand why they've become a favorite for so many. Trust me, you won't want to share once you get a taste! It's simply a delightful blend of creamy peanut butter and rich chocolate, which makes them perfect for any occasion.

Plus, they're super easy to whip up and fit perfectly within the domain of easy no-bake desserts.

Here's what you'll love about this recipe:

  • No baking required—it's quick and simple!
  • Perfect for family gatherings—everyone loves them.
  • Taste testing shows they're a hit with kids and adults alike.
  • You can customize them—add nuts, or swap in different toppings!

Every time I make these bars, my family gathers around, enthusiastically waiting for their turn to try a piece. They've quickly become one of our family favorites.

I can still remember my little cousin's face lighting up when he tasted them for the first time. Those moments make all the joy in cooking worth it!

Recipe

Indulge in the delightful No-Bake Buckeye Cheesecake Bars, a perfect dessert for peanut butter lovers that requires no baking and is easy to make.

This decadent treat layers a creamy peanut butter filling over a graham cracker crust, topped with a rich chocolate layer. It's a crowd-pleaser ideal for any occasion!

Ingredients:

  • 1 ½ cups crushed graham crackers
  • ½ cup melted butter
  • 1 cup creamy peanut butter
  • 1 cup powdered sugar
  • 16 oz cream cheese, softened
  • 1 cup sugar
  • 1 tsp vanilla extract
  • 1 cup whipped topping
  • 1 cup semi-sweet chocolate chips
  • 2 tbsp vegetable oil

Instructions:

  1. In a medium bowl, combine the crushed graham crackers and melted butter. Mix well and firmly press into the bottom of a 9×13 inch baking dish to form the crust.
  2. In a separate bowl, beat together peanut butter, powdered sugar, softened cream cheese, and vanilla extract until smooth and creamy.
  3. Gently fold in the whipped topping.
  4. Spread the peanut butter mixture evenly over the graham cracker crust.
  5. In a microwave-safe bowl, combine the chocolate chips and vegetable oil. Microwave in 30-second intervals, stirring until fully melted and smooth.
  6. Pour the melted chocolate over the peanut butter layer and spread it evenly.
  7. Refrigerate the cheesecake bars for at least 4 hours or until firm.
  8. Cut into squares and serve chilled.

Notes: For easier cutting, let the bars sit at room temperature for about 10 minutes before slicing.

Store leftovers in an airtight container in the refrigerator.

Prep time: 20 minutes

Cooking time: 0 minutes

Serving: 12-16 squares

Calories: Approximately 300 per square

Cuisine: American

Enjoy these No-Bake Buckeye Cheesecake Bars for a rich and satisfying dessert that comes together effortlessly!

Chill Overnight for Optimal Flavor

I can't stress enough how important it's to chill these No-Bake Buckeye Cheesecake Bars overnight!

Allowing them to sit not only helps the flavors meld beautifully, but it also makes for an incredibly smooth texture.

Plus, when it comes time to serve, they slice like a dream, and you'll impress everyone with your amazing dessert!

Enhanced Flavor Development

Chilling your No-Bake Buckeye Cheesecake Bars overnight takes the flavor to another level. Trust me, waiting makes a big difference! When I first made these bars, I was tempted to dive right in.

But letting them chill allowed the flavors to mingle and develop beautifully. It's all about flavor balancing! The peanut butter, cream cheese, and chocolate come together so well after a night in the fridge, creating a smooth, indulgent taste that you'll absolutely love.

Using fresh ingredients is key too. When I use fresh cream cheese and peanut butter, the result is a vibrant flavor that shines through. Each bite feels like a delicious hug!

It also helps the sweetness from the powdered sugar balance out perfectly, so it doesn't overwhelm your taste buds.

If you can resist that first bite and let them chill overnight, you're in for a treat. The bars become richer, and all the individual flavors harmonize like a well-conducted symphony.

Plus, once you finally take a bite, the wait will feel totally worth it. So, set aside that time. You'll be amazed at how much better they taste the next day!

Improved Texture Consistency

The texture of your No-Bake Buckeye Cheesecake Bars truly improves when you let them chill overnight. I can't stress enough how much this simple step transforms the bars!

When I first made them, I was excited to dig in right away. But after giving them that extra time in the fridge, I discovered the magic of texture modifications. The cream cheese becomes creamier, and the peanut butter layer takes on this silky richness that's just delightful.

I've learned that the ingredient ratios play an essential role in achieving that perfect consistency. By letting everything chill together, the flavors meld beautifully, and the bars firm up without losing their creamy feel.

Trust me, it's tough to wait, but the payoff is huge! When you finally cut into them, you'll be rewarded with smooth, luscious squares that practically melt in your mouth.

Easier Serving Experience

Letting the No-Bake Buckeye Cheesecake Bars chill overnight not only enhances their texture but also makes serving a breeze. Trust me, there's something magical about waiting that extra time. When you finally cut into those beautifully set bars, they hold their shape perfectly, making your dessert presentation look professional and impressive!

For serving suggestions, I love to set out colorful plates or even fun paper napkins that match any party theme. Each bar can look fancy with a sprinkle of crushed nuts or drizzled chocolate on top. I've found that offering some fresh fruit on the side makes the dessert pop and adds a rejuvenating twist.

After cutting the bars, let them sit at room temperature for about 10 minutes; that way, they slice like butter! It makes it so easy, and your guests will rave about how lovely they look.

Plus, everyone enjoys that delightful first bite when they can actually taste the creamy layers after all that chilling, right? So, embrace the overnight wait—it's worth it for that stunning dessert everyone will love! Enjoy your kitchen adventures!

Recipe Variations

Let's talk about some fun ways to switch up these No-Bake Buckeye Cheesecake Bars!

I love experimenting with different nuts or toppings to make them even more delicious, and if you're looking for a gluten-free option, there are plenty of crusts to try too.

Trust me, mixing things up can really take your baking to a whole new level!

Nut Alternatives and Swaps

Flexibility in the kitchen is a wonderful thing, especially when it comes to customizing recipes like the No-Bake Buckeye Cheesecake Bars.

If peanut butter isn't your favorite or you're allergic, don't worry! There are plenty of nut butter substitutions and creamy alternatives that you can use.

For a nut-free version, I love using sunflower seed butter. It's creamy, just like peanut butter, but gives a unique taste. You can also try creamy tahini, which adds a rich flavor and keeps everything smooth. Even soy nut butter works if you need that classic kick without any nuts!

Additionally, for those who prefer a lower-fat option, I've found that Greek yogurt can replace some of the nut butter. It won't be as rich, but it still keeps the cheesecake bars light and delicious.

Whichever alternative you choose, the bars will still be a hit at your gatherings. I promise, your friends won't even notice the difference!

Toppings to Enhance Flavor

If you're looking to elevate the No-Bake Buckeye Cheesecake Bars even further, toppings can be a game changer. Trust me, I've tried a few, and it's amazing how a simple addition can make these bars even more delicious!

One of my favorite flavor enhancements is drizzling caramel sauce on top; it adds a rich sweetness that perfectly balances the peanut butter.

If you're feeling adventurous, consider adding crushed pretzels for a salty crunch that pairs well with the creaminess. Chocolate shavings also work wonders, giving a fancy touch that'll impress everyone.

Another topping idea is to sprinkle some chopped nuts on the chocolate layer; it adds an extra layer of flavor and texture.

And let's not forget about whipped cream! A dollop on top can turn these bars into a more dessert-like experience, and it's fun to pile it high! You can even garnish with mini chocolate chips for that extra chocolatey goodness.

With these topping ideas, your No-Bake Buckeye Cheesecake Bars won't just taste amazing, but they'll also look stunning. So, go ahead and experiment—I promise your taste buds will thank you!

Gluten-Free Crust Options

When it comes to making No-Bake Buckeye Cheesecake Bars, I often swap out the traditional graham cracker crust for a gluten-free version to cater to dietary needs without sacrificing flavor. There are some great gluten-free alternatives that work really well! One of my favorites is using almond flour mixed with melted coconut oil. This combination creates a lovely crust texture that's both nutty and delicious.

Another option is to use gluten-free cookies, like Oreo Thins or even rice cakes crushed up into fine crumbs. They add sweetness and a fun crunch, making the bars feel extra special. Just make sure to blend them with some melted butter for that perfect binding!

I always find that the key is balancing ingredients, so don't be afraid to experiment a bit. You can taste as you go, and I promise you'll end up with a crust that's not just gluten-free, but yummy too!

Whether you're whipping these up for a special occasion or just for yourself, these gluten-free crust options make sure everyone can enjoy these delightful treats. Happy baking!

What to Serve With This Recipe

When I enjoy my No-Bake Buckeye Cheesecake Bars, I like to think about the perfect things to serve alongside them. A cold glass of milk or a rich coffee really brings out that peanut butter flavor, and maybe some fresh fruit on the side adds a nice touch too.

For an even more indulgent experience, consider drizzling with chocolate or caramel sauce, as it complements the creamy texture and sweetness of the bars.

Plus, getting creative with the presentation can make these bars pop at any gathering, making everyone want to reach for one! To impress your guests, you could also incorporate ideas from Butterfinger Cheesecake for a delightful flavor adventure.

Perfect Beverage Pairings

For a delightful treat like No-Bake Buckeye Cheesecake Bars, choosing the right beverage can elevate the entire dessert experience.

I love pairing these bars with a nice, rich cup of coffee. The bold flavor of coffee really highlights the sweetness of the cheesecake and chocolate layers. If you're in a festive mood, how about a chocolate martini? It's a fun cocktails pairing that adds a delightful twist to your dessert!

For those warm summer days, a rejuvenating glass of sweet tea is a perfect drink suggestion. It's a family favorite around here, and the iced variety complements the creamy texture of the cheesecake bars wonderfully.

And don't forget about the kiddos! Homemade lemonade or cream soda makes fantastic kid-friendly drinks that everyone enjoys, adding a burst of flavor without stealing the show.

If you're feeling adventurous, seasonal beverages, like pumpkin spice lattes in the fall, offer a fun, cozy touch.

Whatever you choose, be sure to think about the flavor profiles; the key is finding a drink that enhances the deliciousness of these bars.

Now, let's dig in!

Ideal Side Dishes

Savoring a slice of No-Bake Buckeye Cheesecake Bars calls for thoughtfully chosen side dishes that enhance the overall experience. I love pairing these rich, creamy bars with lighter sides that balance the flavors. Here are some delightful options you might enjoy:

Side Dish Why It Works Serving Suggestion
Flavorful Dips They add a fun, savory component that contrasts well with the sweetness. Try a spicy salsa or creamy guacamole! Serve in small bowls with tortilla chips on the side.
Fruit Platters Fresh, juicy fruit brightens up the dessert table and offers a revitalizing taste. Choose colorful options like strawberries, grapes, and pineapple! Arrange them on a large platter for guests to grab.
Mini Pretzel Bites The salty crunch from pretzel bites creates a delightful contrast to the sweet bars, making every bite exciting. Serve with mustard or cheese dip for extra flavor.

With these side dishes, you'll create a well-rounded dessert experience that everyone will love. Trust me, these combinations will elevate your No-Bake Buckeye Cheesecake Bars and impress your guests. Enjoy the culinary journey!

Festive Presentation Ideas

Creating a festive presentation for No-Bake Buckeye Cheesecake Bars can truly elevate your dessert experience, especially when you want to impress your guests. I love arranging these bars on a colorful platter, which instantly makes them more inviting.

For a pop of color, you could add a sprinkle of crushed nuts or even some fun, seasonal sprinkles over the chocolate layer. It's all about the festive garnishing!

I also recommend pairing them with some fresh strawberries or raspberries for a burst of tanginess that complements the sweetness. You can even set the bars on a decorated table with seasonal napkins or plates to match the vibe of your gathering.

Another fun idea is to top each bar with a small dollop of whipped cream or a drizzle of chocolate for that extra flair. Remember, a sprig of mint can add a lovely touch too!

For seasonal serving, consider placing them by a cozy hot cocoa station. It creates a delightful dessert corner that your guests will love. Trust me, with a little creative flair, these cheesecake bars will steal the show!

Perfect for Summer Gatherings

As summer gatherings heat up, there's nothing quite like a cool and creamy dessert to please a crowd. When the sun's shining and friends are gathered for outdoor parties, my No-Bake Buckeye Cheesecake Bars make the perfect treat!

They're simple to whip up, and I love how the mix of peanut butter and chocolate brings smiles to everyone's faces. Perfectly portable and adaptable for various flavor combinations, these bars are ideal for any occasion. The rich flavors and textures will delight your guests.

These bars are a hit at all my summer events. Picture it: the grill's going, laughter fills the air, and I serve these cheesecake bars straight from the fridge.

They're not only invigorating, but they also hold up well in the heat, so you don't have to worry about a melty mess. Plus, since they don't require baking, I can spend more time chatting with my friends instead of hovered over a hot oven.

I usually cut them into cute little squares for easy serving. Everyone dives in, and trust me, they'll be asking for the recipe.

Frequently Asked Questions

Can I Use Reduced-Fat Cream Cheese for This Recipe?

Using reduced-fat cream cheese is a smart idea, but it might not create the velvety cheesecake texture we're after. I've tried cream cheese substitutions before and found regular cream cheese really delivers that dreamy richness we crave!

How Long Do These Bars Last in the Refrigerator?

The bars typically last about a week in the refrigerator. I recommend storing them in an airtight container to maintain freshness. For ideal shelf life, enjoy them within that time frame for the best taste!

Can I Substitute Almond Butter for Peanut Butter?

I once used almond butter in a dessert and loved the results. Almond butter offers extra benefits like lower carbs and more fiber, making it a great peanut butter alternative for those seeking variation in recipes.

What Is the Best Way to Store Leftovers?

To store leftovers safely, I place them in an airtight container and keep them in the refrigerator at a consistent temperature. This helps maintain freshness and guarantees food safety for up to a week.

Is There a Gluten-Free Option for the Crust?

I've made a gluten-free crust using almond flour and melted butter. For sweetness, I substitute with alternative sweeteners like stevia or erythritol. It's delicious and perfect for those avoiding gluten!

Share your love
Norma Ector

Norma Ector