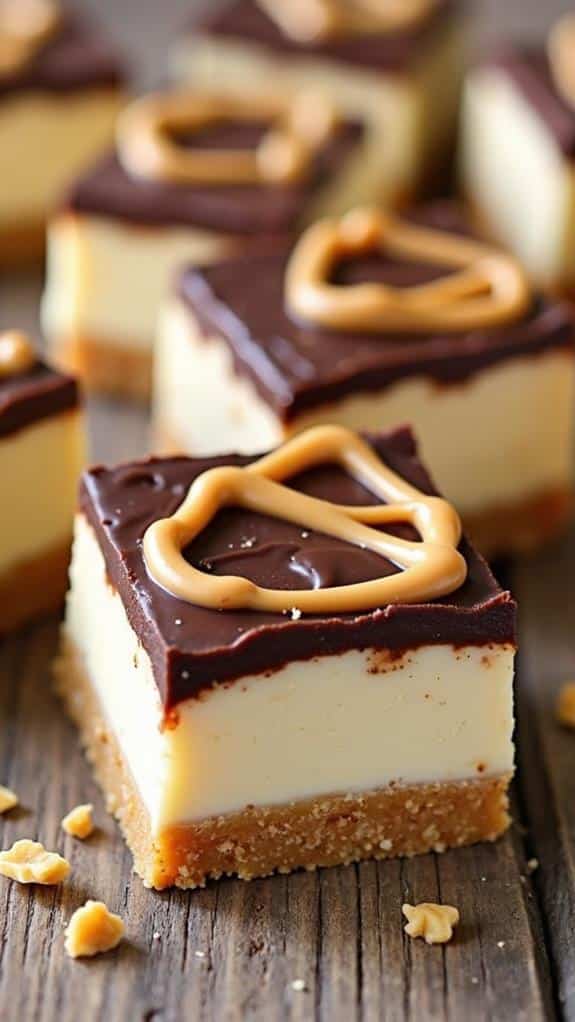
I absolutely love making No-Bake Buckeye Cheesecake Bars! They’re super easy and perfect for impressing friends at parties. You just mix graham cracker crumbs with melted butter for the crust and whip together cream cheese, peanut butter, and whipped topping for a creamy filling. After chilling them for a few hours, you pour melted chocolate on top, and voila! You’ve got a delicious treat. Each bite is a delightful mix of chocolate and peanut butter that my whole family enjoys. If you’re curious about serving ideas or fun tweaks, I’m excited to share more tips that’ll take your dessert game up a notch!
What You’ll Love About This Recipe
When I first tried these No-Bake Buckeye Cheesecake Bars, I was instantly smitten. As a chocolate lover, I couldn’t believe how easy these desserts were to whip up.
You’ll love them too! Here’s why:
- Rich chocolate flavor
- Creamy cheesecake texture
- No baking required
- Perfect for gatherings
- Quick prep time
Dive into freedom with every bite!
Recipe
Indulge in the decadent delight of No-Bake Buckeye Cheesecake Bars, a perfect mix of creamy cheesecake and rich chocolate, all without the need for baking!
Ingredients:
For the crust:
- 1 ½ cups graham cracker crumbs
- ½ cup unsalted butter, melted
- ¼ cup sugar
For the cheesecake filling:
- 8 oz cream cheese, softened
- ½ cup peanut butter
- ½ cup powdered sugar
- 1 cup whipped topping
For the chocolate topping:
- 1 cup semi-sweet chocolate chips
- 2 tbsp coconut oil
Instructions:
- In a mixing bowl, combine graham cracker crumbs, melted butter, and sugar. Press the mixture into a greased 9×9-inch pan to form the crust.
- In another bowl, beat the softened cream cheese, peanut butter, and powdered sugar until smooth. Gently fold in the whipped topping until well combined.
- Spread the cheesecake filling evenly over the crust layer.
- In a microwave-safe bowl, combine the chocolate chips and coconut oil, heating in 30-second intervals until melted and smooth. Pour the chocolate over the cheesecake layer and spread it out evenly.
- Refrigerate for at least 4 hours, or until set. Cut into bars and serve chilled.
Notes:
- For a more intense peanut butter flavor, consider adding more peanut butter to the filling.
- You can substitute graham cracker crumbs with crushed Oreos for a twist on the crust.
Time:
- Prep time: 20 minutes
- Cooking Time: N/A (No-Bake)
- Total Time: 4 hours (includes setting time)
- Servings: 12 bars
- Calories: Approximately 250 calories per bar
- Cuisine: American
Enjoy these No-Bake Buckeye Cheesecake Bars as a delightful dessert that’s sure to satisfy your sweet tooth without ever turning on the oven!
Equipment
To whip up these No-Bake Buckeye Cheesecake Bars, you’ll need a few essential pieces of equipment.
Trust me, having the right tools makes it so much easier!
- Cheesecake molds
- Mixing bowls
- Electric mixer
- Rubber spatula
- Baking pan
Embrace the freedom of no bake techniques, and let’s create something delicious together!
What to Serve With This Recipe
When I whip up these No-Bake Buckeye Cheesecake Bars, I love thinking about what to pair them with to make the treat even more special.
You might want to contemplate some delicious drink options or maybe even a complementary dessert to really impress your guests.
Plus, if you’re hosting a party, I’ve got some fun serving ideas that’ll take your cheesecake bars to the next level!
Ideal Beverage Pairings
Pairing the rich flavors of No-Bake Buckeye Cheesecake Bars with the right beverages can elevate your dessert experience.
I love enjoying these bars with a strong coffee; it perfectly balances the sweetness.
If you’re in the mood for something a bit fancier, try pairing them with a sweet dessert wine.
Trust me, it’s a match made in delicious heaven! Enjoy every bite!
Complementary Dessert Options
Nothing complements the indulgence of No-Bake Buckeye Cheesecake Bars quite like a selection of delightful desserts that play off their rich chocolate and peanut butter flavors.
Try some chocolate pairings, like rich brownies or a chocolate trifle, to keep that sweetness flowing.
You can even whip up easy peanut butter desserts, like cookies, for a fun treat that everyone loves!
Party Serving Suggestions
Hosting a gathering? Let those No-Bake Buckeye Cheesecake Bars shine!
I love pairing them with fun, themed treats like mini cupcakes or fruit skewers. For different party themes, adjust your serving sizes—try cutting the bars into smaller bites for a casual gathering or larger pieces for a cozy get-together.
Everyone will appreciate a delightful mix that keeps the vibes sweet and festive!
Frequently Asked Questions
Can I Use a Different Nut Butter in This Recipe?
I love experimenting with alternative nut butters. Just remember, taste differences can alter the final flavor. It’s all about exploring and finding what you enjoy most, so don’t hesitate to get creative!
How Long Can I Store These Bars in the Fridge?
I’d suggest you store these bars in the fridge for up to a week. For peak freshness, I recommend using airtight containers. Following these storage tips can help guarantee a longer shelf life, too!
Can I Freeze No-Bake Buckeye Cheesecake Bars?
When I think about freezing, it’s like capturing a moment in time. Yes, you can freeze them! Just know that texture differences might occur, so use proper freezing techniques to keep them deliciously indulgent!
What Substitutions Can I Make for Cream Cheese?
If you’re looking for cream cheese alternatives, try using Greek yogurt or silken tofu. I’ve also enjoyed vegan cream cheese; it adds a similar texture without dairy, giving you delicious, guilt-free options to explore.
How Can I Make These Bars Gluten-Free?
If you’re seeking freedom from gluten, I suggest using a gluten-free crust like almond flour or coconut flour. You can play with alternative sweeteners, too, crafting a delightful treat that’s kind to your taste buds!


